Table of Contents
Build
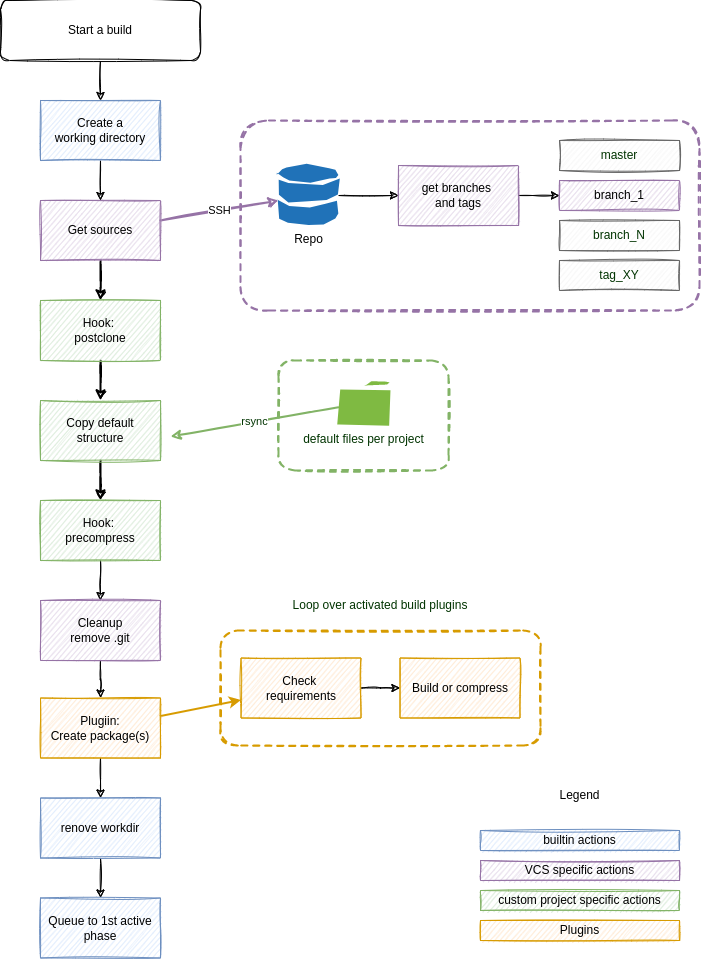
A build process can be started …
- by
Buildbutton on overview page - by
Buildbutton in application view - by API call
Among its steps are some builtin, some depend on the project settings and some can be influenced by the developers.
A build is denied if a project has no activated phase the project settings.
Overview

Steps
Create working directory
Outdated kept builds will be cleaned up.
Below /var/imldeployment/build/ a subdirectory with the id of the project will be created. In that one a uniq directory will be created by using a timestamp.
Get sources
The git clone fetches the sources from the Git repository
Remark: at the moment ony Git is suported as version control system. An interface in the classes subdir describes the required method to be implemented. An additional VCS will be available in the project settings if it was added.
Project specific actions
An chmod 755 /hooks/on* makes hook scripts executable.
These steps will be executed if they exist:
-
hooks/onbuild-postclone- actions after cloning the sources - Sync other default files that are not in the repository - it was needed for rarely special projects.
-
hooks/onbuild- actions before runinng the build or compression
Recommendation:
Use a script named hooks/onbuild and put your project specisif actions into it.
Read the next chapters to use given environment and scripts.
Custom vars
A file named ci-custom-vars will be created containing the given data in the project config. Its idea is to be sourced by hook script to set variables in the current shell.
Example:
If it contains
export myVar="hello world"
it can be sourced with this snippet:
cd `dirname $0`
cd ..
. ci-custom-vars || exit 1
echo myVar=$myVar
Builtin environment
- $GIT_SSH - full path to git ssh wrapper (CI-Root/shellscripts/gitsshwrapper.sh)
- $DIR_SSH_KEYS - full path to ssh keys (/var/imldeployment/data/sshkeys)
- $DIR_APPROOT - full path of the current build directory (z.B. /var/imldeployment/build/ci-webgui/ci-webgui_20171211-102707)
- $RVMSCRIPT - for Rails projects: path to the RVM script. With it you can set a custom Ruby version
- $NVMINIT - for NodeJs projects - to install a custom node version
- $ENVINIT - to set a Java and Maven version
Snippets:
Set a Ruby version
(1) Rvm must be installed on the server where the ci server runs.
. $RVMSCRIPT || exit 1
rvm use 2.2.3
Set a custom Nodejs version
(2) The NVM init script is part of the ci server.
. $RVMSCRIPT || exit 1
rvm use 2.2.3
. $NVMINIT || exit 1
nvm install [Version]
⚠️ Important: at the end of the hook script uninstall it by using nvmremove.
Ressources:
- CI-Git-Repo .. nvm_init.sh: https://git-repo.iml.unibe.ch/iml-open-source/imldeployment/-/blob/master/shellscripts/nvm_init.sh
- NVM: https://github.com/nvm-sh/
Set a custom Java or Maven version
In the onbuild a developer can set a java version without knowledge of its installation path. Java ando or Maven that must be
- installed locally
- added in shellscripts/env_init.sh.cfg
In the onbuild script their versions can be set by sourcing the shell script in variable $ENVSCRIPT:
. $ENVSCRIPT --java 23 --maven 3.9.8
Ressources:
- CI-Git-Repo .. env_init.sh: https://git-repo.iml.unibe.ch/iml-open-source/imldeployment/-/blob/master/shellscripts/env_init.sh
- CI-Git-Repo .. env_init.sh.cfg.dist: https://git-repo.iml.unibe.ch/iml-open-source/imldeployment/-/blob/master/shellscripts/env_init.sh.cfg.dist
Remove vcs data
The version control data (.git directory in build root) will be removed.
Build or compress
(1)
A metafile [Projecd_ID].json will be created in the build root. It will be used to identify the package or installation. It contains date, branch and commit message.
(2) WIP
All available built plugins have the name of the subdirs below public_html/deployment/plugins/build/.
A loop over available plugins will execute the activated build plugins to initialize one or builds.
The output dir is /var/imldeployment/packages/_files/[Project_ID]/. Here are subdirectories with the timestamp when the build was started, e.g. ./20220705_115145/
(3) If there are files in hooks/templates/ the will be copied into the package output directory. They can be used by automation tools like puppet to generate configuration files for different targets and different phases.
Remove build dir
If all actions were successful the buld directory will be deleted.
Add in queue of 1st phase
A successful build triggers the queuing to the first active phase of this project.
A phase can define deploy times to define, when a rollout is allowed. In the special case that the deploy time has no limit it will be installed instantly. Otherwise you will see the package in the queue column of a phase.
If a build fails
The working directory will be kept. In the project config the number of kept projects is set (default: 3). Additionally old failed builds (older 7 days) will be deleted by a cronjob.
If you open the project in the web ui you find the kept folders in the tab “Build errors”.
A sysadmin with access to the ci server can switch to the build directory and repeat the execution of a hook script.